Sunday, November 7, 2010
Saturday, October 16, 2010


Sunday, September 5, 2010

Tuesday, August 17, 2010
A few interesting DIY panorama head ideas
I wanted a cheap single-row pano head, so I searched DIY pano heads on the web.
Among many of DIY pano heads that I've found these were interesting.
Victor van Dijk's DIY pano head using stock Manfrotto parts.

Peter Reimer's DIY pano head that uses a ballhead mounted upside down.
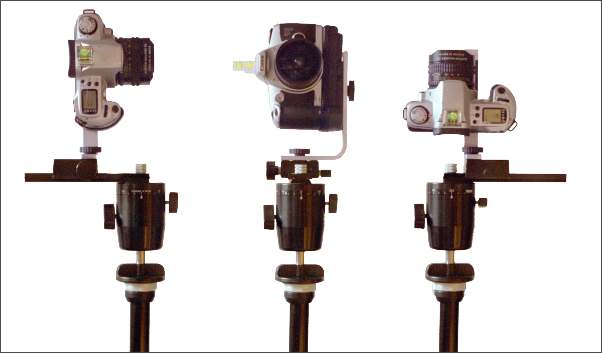
Erik Krause's DIY pano head that also uses upside down ballhead
My Plan:
Upside down ballhead idea seemed great as it could be very inexpensive, if you already own a ballhead with separate pan lock, and the camera can be rotated around lens nodal point instead of orbiting around the center of the tripod. Yet you keep the convenience and stability of your ballhead.
Unfortunately I don't own a ballhead with separate pan lock.
I ended up ordering a panning base and Manfrotto sliding plate
The panning base will be placed on top of the ballhead, and the sliding plate will be mounted on the panning base to position the camera off-centered so that the lens' nodal point concided with the center of the panning base. Well, that's the plan.
Among many of DIY pano heads that I've found these were interesting.
Victor van Dijk's DIY pano head using stock Manfrotto parts.
Peter Reimer's DIY pano head that uses a ballhead mounted upside down.
Erik Krause's DIY pano head that also uses upside down ballhead
My Plan:
Upside down ballhead idea seemed great as it could be very inexpensive, if you already own a ballhead with separate pan lock, and the camera can be rotated around lens nodal point instead of orbiting around the center of the tripod. Yet you keep the convenience and stability of your ballhead.
Unfortunately I don't own a ballhead with separate pan lock.
I ended up ordering a panning base and Manfrotto sliding plate
The panning base will be placed on top of the ballhead, and the sliding plate will be mounted on the panning base to position the camera off-centered so that the lens' nodal point concided with the center of the panning base. Well, that's the plan.
Wednesday, August 4, 2010


Saturday, July 24, 2010
Another lens profiling attempt using Hugin
I created a lens profile of Samyang 14mm f/2.8 using this "Samyang 14mm f/2.8 Canon 7D Sample" from 360 Tactical VR's blog
Hover mouse pointer over images to see corrected images. Vignetting correction was also applied.


Hover mouse pointer over images to see corrected images. Vignetting correction was also applied.
Thursday, July 22, 2010
Working on lens correction
I've been working on lens correction recently. More speicifically correcting distortion.
One of my cheap lenses has a strong mustache distortion at the wide end. Just like this:

So, I tried PTLens, an inexpensive and popular lens correction tool. It did an OK job. Though I could still see mustache distortion after PTLens treatment. Of course, I wasn't happy.
Then I decided to use Hugin to solve this problem. When you create a panorama using Hugin, often times you get a lens profile as a by-product along with a beautifully stitched panoramic image, if you used Hugin's optimizer. Since I had not used this cheap wide angle lens for panorama, I didn't have its lens profile yet.
So, naturally I carefully determined the non-parallax point of the lens at its wide end of focal length. Shot a 360 panorama with the lens. I chose my living room for this little photo shoot where there are a lot of straight vertical lines. The aperture was set f/11 and I focused at hyperfocal distance.
Loaded images into Hugin. Manually created vertical control points. Ran control point detector. Then the rest is just same as a usual stitching process. In the end, I got a decent lens profile that's tailored for my own copy of the lens.
Move your mouse pointer over the image to see 'corrected' image.

The next step will be iterating this process with different focal lengths of the lens.
One of my cheap lenses has a strong mustache distortion at the wide end. Just like this:

So, I tried PTLens, an inexpensive and popular lens correction tool. It did an OK job. Though I could still see mustache distortion after PTLens treatment. Of course, I wasn't happy.
Then I decided to use Hugin to solve this problem. When you create a panorama using Hugin, often times you get a lens profile as a by-product along with a beautifully stitched panoramic image, if you used Hugin's optimizer. Since I had not used this cheap wide angle lens for panorama, I didn't have its lens profile yet.
So, naturally I carefully determined the non-parallax point of the lens at its wide end of focal length. Shot a 360 panorama with the lens. I chose my living room for this little photo shoot where there are a lot of straight vertical lines. The aperture was set f/11 and I focused at hyperfocal distance.
Loaded images into Hugin. Manually created vertical control points. Ran control point detector. Then the rest is just same as a usual stitching process. In the end, I got a decent lens profile that's tailored for my own copy of the lens.
Move your mouse pointer over the image to see 'corrected' image.
The next step will be iterating this process with different focal lengths of the lens.
Tuesday, July 20, 2010

Monday, July 19, 2010


Thursday, July 15, 2010

Wednesday, June 23, 2010

 360 virtual reality vr panorama
Tuesday, June 22, 2010
 360 virtual reality vr panorama
Monday, June 21, 2010
Sunday, June 20, 2010
Friday, June 18, 2010
Sunday, June 13, 2010
 360 virtual reality vr panorama
Thursday, June 10, 2010
Wednesday, June 9, 2010
Saturday, May 29, 2010
Friday, May 28, 2010
Thursday, May 27, 2010
Tuesday, May 18, 2010
Friday, May 14, 2010
Saturday, May 8, 2010
Friday, May 7, 2010
Tuesday, May 4, 2010
Sunday, May 2, 2010
Sunday, April 25, 2010
Wednesday, April 21, 2010
Wednesday, April 14, 2010
Tuesday, February 23, 2010
Subscribe to:
Posts (Atom)